How to Add Reading Progress bar on top of header in your blogger website
Howdy's Today I brings out a unique feature for bloggers to catch user insight. Everyone knows about the progress bar or Reading Position Indicator which fetches the page look Professional as well user friendly. Yeah, you may have noticed various Google products to reflect the reading position of the page.
You may have known or listened to blogger doesn't have too multiple plugins to create your website look attractive like WordPress. Whereas WordPress provides you a lot of features and plugins to add the beauty of your website but it's paid. You can add it easily in WordPress named plugin as RPI (Reading Position Indicator) but blogger doesn't provide such kind of plugin cause it's a free platform to drive website.
Why do you need to add?
This feature is not important for bloggers users but If you expanded RPI (Reading Position Indicator) in your blogger theme, it modifies the prettiness of your web pages which not only specifies attraction but also compiles the reading position of the page. When visitors will see your blog pages then they attractive to the website while reading, the progress bar wanders the length of it towards the right. So readers recognize how much longer the page has quit to look over.
How does it work?
The horizontal progress color bar is turning from the left side to the right side on the top of the pages. This progress bar is catching a glimpse of the position of the whole page height then it began to change position. Assume, you scrolled 45% of the blog page then the progress bar moves with the color of the position 45% horizontal on the top of the page. If you scroll further percentage of the page, the horizontal colored bar and extent the bar or line will increase along with it where the page has changed the position to the right.
Once you enrolled in an amazing reading bar in your blogger theme, it specializes simultaneously on the blogger home, post, or pages of the website. This feature also works on your desktop, tablet, and smartphones too.
How to Launch Progress Bar?
Let's start to launch Reading Progress Bar to your blogger theme.
Customization
1 : Log in to your Blogger account and if you are operating many blog websites then choose the applicable Blog to launch the progress bar feature
2 : Enter into the Blogger dashboard
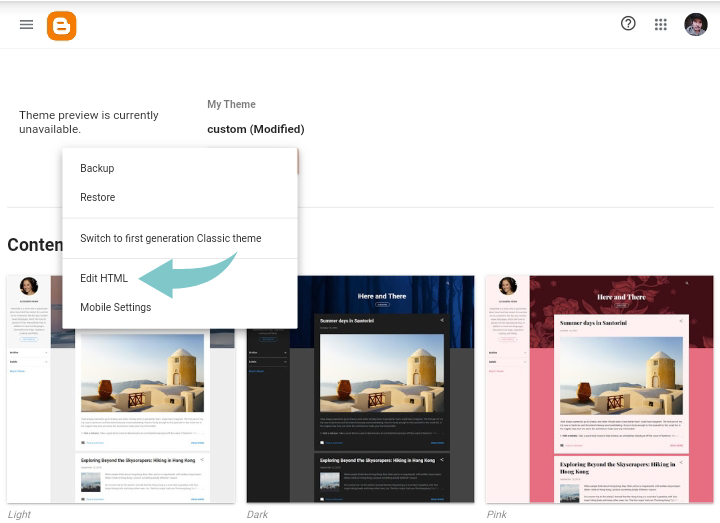
3 : Select the Theme tab and click the Edit HTML button
4 : Find the ending tag ]]></b:skin> by pressing Ctrl+F (Windows) and copy the below CSS code & paste it above ending ]]></b:skin>
For the Solid color progress bar please use this CSS code
.progress-container{width:100%;position:fixed;z-index:99;top:0;left:0;}.progress-bar{height:5px;background:#0000FF;}For the Gradient color progress bar please use this CSS code
progress-container{width:100%;position:fixed;z-index:99;top:0;left:0;}.progress-bar{height:5px;background: linear-gradient( 102.1deg, #1CD8D2 8.7%, #93EDC7 88.1% );}To customize color, you can use Color Picker to change the progress bar color from the gradient color CSS codes.
5 : Search <body> and just below opening body tag add the below HTML script.
<div class='progress-container'><div class='progress-bar' id='myBar' style='width:0%;'/> </div>6 : similarly search </body> and before closing the body tag enlarge the below JavaScript code.
<script>window.onscroll = function() { myFunction()};function myFunction(){ var winScroll = document.body.scrollTop || document.documentElement.scrollTop; var height = document.documentElement.scrollHeight - document.documentElement.clientHeight; var scrolled = (winScroll / height) * 100; document.getElementById("myBar").style.width = scrolled + "%";}</script>Now the Click on the Save theme.
If you fulfilled all the steps correctly then you will receive the final result of your website effectively.
I hope you will find out good result after visiting your website. This progress bar feature brings prettiness to website.


Post a Comment